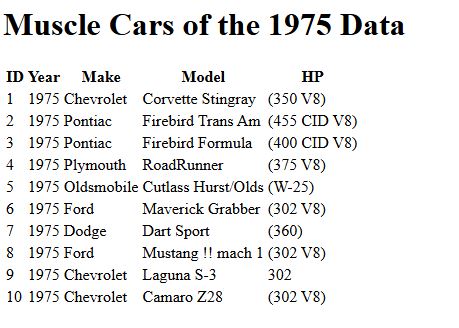
In this article we’ll show how to generate a simple HTML table from a JSON data structure. Although there are several ways to do this, we’ll concentrate on the powerful D3.js library. First, let’s set up the basic HTML page and include D3.
First, you need to include the D3.js library in your project.
<script src="https://cdnjs.cloudflare.com/ajax/libs/d3/7.9.0/d3.min.js"></script>The front‑end setup is simple: we just need a container element into which the table, its headers, and its body will be dynamically injected.
<div id="table-container"></div>Finally, we link a custom JavaScript module that will generate the table and provide additional functionality for future use.
<script src="https://cdnjs.cloudflare.com/ajax/libs/d3/7.9.0/d3.min.js"></script>
<script type="module">
    import d3ObjectsResources from '/D3Learning/d3ObjectsResources.js?ver=<%=Guid.NewGuid().ToString() %>';

    // Waits until the HTML document has been fully loaded before running our code
    document.addEventListener('DOMContentLoaded', () => {
        const sf = new d3ObjectsResources();
    });
</script>
Putting everything together, your basic HTML structure should look like this:
<!DOCTYPE html>
<html lang="en">
<head>
    <meta charset="UTF-8">
    <meta name="viewport" content="width=device-width, initial-scale=1.0">
    <link rel="stylesheet" href="https://cdnjs.cloudflare.com/ajax/libs/font-awesome/6.0.0/css/all.min.css">
    <style>
        table {
            border-collapse: collapse; /* Merge borders */
            margin: 0 auto;            /* Center the table */
            width: 50%;                /* Relative width */
        }
        table, th, td {
            border: 1px solid black;   /* Add borders */
        }
        th, td, h1 {
            text-align: center;        /* Center content horizontally */
            vertical-align: middle;    /* Center content vertically */
            padding: 0.5rem;           /* Add padding */
        }
    </style>
    <script src="https://code.jquery.com/jquery-1.7.1.min.js"></script>
    <script src="https://cdnjs.cloudflare.com/ajax/libs/d3/7.9.0/d3.min.js"></script>
    <script type="module">
        import d3ObjectsResources from '/D3Learning/d3ObjectsResources.js?ver=<%=Guid.NewGuid().ToString() %>';
        document.addEventListener('DOMContentLoaded', () => {
            const sf = new d3ObjectsResources();
        });
    </script>
    <title>Remove a row in D3</title>
</head>
<body>
    <h1>Muscle Cars of the 1975 Data</h1>
    <div id="table-container"></div>
</body>
</html>
Creating the D3 Logic
Next, we’ll build the JavaScript logic. We’ll define a class called
d3ObjectsResources using modern ECMAScript (ES6+) syntax. This
yields cleaner, more maintainable, and easier‑to‑understand code.
No matter which web framework or tooling you use, the end result is always manipulation of the Document Object Model (DOM). In this tutorial we rely on D3.js because of its flexibility and interoperability. As an Angular developer, I often integrate D3 to query data and create dynamic, data‑driven user experiences.
Let’s dive into the code. Below is a skeleton for our JavaScript class. It
includes a constructor, initialization logic, event handlers, and a
PopulateTable method. I frequently use this template as a starter
for building object‑oriented JavaScript modules.
class d3ObjectsResources {
    constructor() {
        // Setup initialization
    }

    Init = () => {
    }

    EventHandlers = () => {
    }

    // Load table methods
    PopulateTable = (data) => {
    }
}
export default d3ObjectsResources;
Inside the constructor, we define the JSON dataset that will populate our table.
constructor() {
    this.tableData = [
        { ID: 1, Year:'1975' , Make: 'Chevrolet' , Model: 'Corvette Stingray', HP: '(350 V8)'},
        { ID: 2, Year:'1975' , Make: 'Pontiac' , Model: 'Firebird Trans Am', HP: '(455 CID V8)'},
        { ID: 3, Year:'1975' , Make: 'Pontiac' , Model: 'Firebird Formula ', HP: '(400 CID V8)'},
        { ID: 4, Year:'1975' , Make: 'Plymouth' , Model: 'RoadRunner', HP: '(375 V8)'},
        { ID: 5, Year:'1975' , Make: 'Oldsmobile' , Model: 'Cutlass Hurst/Olds', HP: '(W-25)'},
        { ID: 6, Year:'1975' , Make: 'Ford' , Model: 'Maverick Grabber', HP: '(302 V8)'},
        { ID: 7, Year:'1975' , Make: 'Dodge' , Model: 'Dart Sport', HP: '(360)'},
        { ID: 8, Year:'1975' , Make: 'Ford' , Model: 'Mustang !! mach 1', HP: '(302 V8)'},
        { ID: 9, Year:'1975' , Make: 'Chevrolet' , Model: 'Laguna S-3', HP: '302'},
        { ID: 10, Year:'1975' , Make: 'Chevrolet' , Model: 'Camaro Z28', HP: '(302 V8)'}
    ];

    this.Init();
}
Using D3’s select and append methods, we start manipulating our designated HTML container by selecting the parent div element.
const table = d3.select("#table-container")
                .append("table");
This creates a table element in the DOM and returns a reference to it. From here we can chain additional commands to append the table header (thead) and body (tbody).
const thead = table.append("thead");
const tbody = table.append("tbody");
Next we iterate over our JSON data to generate the table rows (tr) and header cells (th) dynamically. Below is the full implementation of the PopulateTable method:
PopulateTable = (data) => {
    const columns = ["ID", "Year", "Make", "Model", "HP"];
    const table = d3.select("#table-container").append("table");
    const thead = table.append("thead");
    const tbody = table.append("tbody");

    // Append the header row
    thead.append("tr")
        .selectAll("th")
        .data(columns) // Bind column names to header cells
        .enter()
        .append("th")
        .text(d => d);

    // Create a row for each object in the data
    const rows = tbody.selectAll("tr")
        .data(data)
        .enter()
        .append("tr")
        .attr("data-id", function(d) { return d.ID; });

    // Create a cell in each row for each column
    const cells = rows.selectAll("td")
        .data(function(row) {
            // Map the row data to an array of objects for each cell
            return columns.map(function(column) {
                return { column: column, value: row[column] };
            });
        })
        .enter()
        .append("td")
        .html(d => d.value); // Set the cell text to the value
}
The final step is to invoke the PopulateTable method within our initialization routine. I generally include a simple console.log during initialization as a quick health check to confirm the script is executing.
Init = () => {
    console.log('INIT');
    this.EventHandlers();
    this.PopulateTable(this.tableData);
}
To view the results in VS Code, launch Live Server. You should see a basic, yet dynamically generated table rendered on your screen.